
If you’re looking to enhance the functionality of your website, adding a subdomain in Godaddy is an excellent way to achieve this goal. In this section, we will guide you step-by-step on how to add a subdomain in Godaddy, ensuring you get it right the first time around.
To get started, you need to understand what subdomains are and their purpose. Once you have a clear understanding of this concept, you can proceed to access your Godaddy account.
Creating a subdomain in Godaddy involves following a few essential steps carefully. We’ll provide you with a detailed guide that will help you make the process a success. Additionally, we’ll share tips and best practices that will ensure a successful subdomain setup in Godaddy.
By Following the guide provided by Techy Jin, you’ll be able to add a subdomain in Godaddy with ease. Implementing the best practices and tips will help you maximize functionality and performance, ensuring you achieve your website’s goals. Let’s get started with understanding subdomains in Godaddy.
Post Contents
- 1 Understanding Subdomains in Godaddy
- 2 Accessing Your Godaddy Account
- 3 How to Create a Subdomain in a Godaddy Account?
- 4 Godaddy Subdomain Management
- 5 Creating a Subdomain in Godaddy
- 6 Tips for Successful Subdomain Setup in Godaddy
- 7 Managing Your Subdomains in Godaddy
- 8 Conclusion
- 9 FAQ
- 9.1 How do I add a subdomain in Godaddy?
- 9.2 What are subdomains and how do they work in Godaddy?
- 9.3 How do I access my Godaddy account to create a subdomain?
- 9.4 Can you provide a step-by-step guide to creating a subdomain in Godaddy?
- 9.5 What are some tips for a successful subdomain setup in Godaddy?
- 9.6 How do I manage my subdomains in Godaddy?
Understanding Subdomains in Godaddy
Before we dive into the process of adding a subdomain in Godaddy or transferring the domain to Godaddy, it’s essential to understand what subdomains are and their purpose. In simple terms, a subdomain is an extension of your main domain name that allows you to create separate web addresses for various parts of your website.
For example: If your main domain is www.example.com, a subdomain could be blog.example.com or shop.example.com. This allows you to categorize and organize your website content for easier navigation for your visitors.
Subdomains can also be used to create mirror sites for different regions or languages. For instance, if your main website is in English, you can create subdomains for Spanish-speaking visitors (es.example.com) and French-speaking visitors (fr.example.com).
Now that you understand the purpose of subdomains, let’s explore how to set them up in your Godaddy account.
Accessing Your Godaddy Account
To create a subdomain in Godaddy, you need to first log in to your Godaddy account. Don’t worry if you don’t have an account yet. You can easily create one by following the simple steps outlined on the Godaddy homepage.
Once you have successfully logged in to your Godaddy account, navigate to the Products tab and click on Manage All under the Web Hosting section. This will take you to the Web Hosting dashboard, where you can access all the settings related to your web hosting account.
On the Web Hosting dashboard, locate the domain name for which you want to create a subdomain. Click on the domain name to access the Dashboard for that domain. This is where you can manage all the settings related to that domain, including creating subdomains, managing email accounts, and more.
Now that you are on the Dashboard for the domain, scroll down to the Settings section and click on Subdomains.
How to Create a Subdomain in a Godaddy Account?
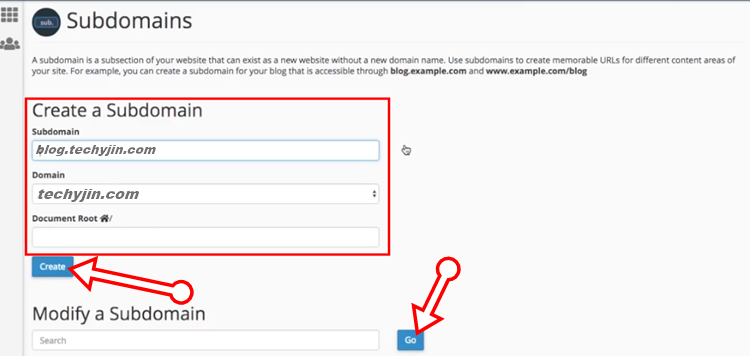
Once you have accessed the Subdomains section, click on the Create Subdomain button. This will open a new window where you can enter the details for your new subdomain.
In the Name field, enter the name of your subdomain. For example, if you want to create a subdomain for a blog section of your website, you could name it a blog. Make sure to choose a name that is relevant to the content that will be hosted on the subdomain.
Related Guide: Is Godaddy SEO Worth It?
In the Root Domain field, select the domain name for which you want to create the subdomain. This field will be pre-populated with the domain name for which you accessed the Subdomains section.
In the Document Root field, enter the path where you want to host the files for your subdomain. This field is optional, and if left blank, Godaddy will create a default directory for your subdomain.
Once you have entered all the required details, click on the Create button to create your new subdomain. Congratulations, you have successfully created a subdomain in Godaddy!
Godaddy Subdomain Management
After creating a subdomain in Godaddy, you can manage it by accessing the Subdomains section in your domain’s Dashboard. Here, you can view all the subdomains associated with your domain and make changes to their settings.
You can click on the Edit button next to a subdomain to change its settings, such as its name or document root. You can also click on the Delete button to remove a subdomain from your account.
Remember, it’s essential to regularly manage your subdomains to keep them up-to-date and in line with your website’s goals. With Godaddy’s user-friendly interface and easy-to-use tools, managing your subdomains has never been easier.
Creating a Subdomain in Godaddy
Now that you have accessed your Godaddy account, it’s time to create a subdomain. Follow this step-by-step guide for a successful Godaddy subdomain setup:
- Click on the “Manage My Domains” option in your account dashboard.
- Locate the domain name you want to add a subdomain to and click on the three dots on the right side of the domain name.
- Click on the “DNS” button from the dropdown menu.
- Scroll down to the “Add” section and select “Subdomain“.
- Type in the name of your subdomain in the “Subdomain” field.
- Select the root domain you want to attach the subdomain to from the “Root Domain” dropdown menu.
- Enter the path to the document root for the subdomain’s website in the “Document Root” field. If you’re unsure what to enter in this field, leave it blank.
- Click on the “Save” button to create your new Godaddy subdomain.
You have now successfully created a subdomain in Godaddy! It may take some time for the changes to take effect, but once they do, you can start utilizing your new subdomain.
It’s essential to note that each subdomain you create must have a separate document root. This means that if you have multiple subdomains, you’ll need to keep track of their individual document roots.
Following these steps will ensure a successful subdomain setup in Godaddy. Remember to regularly manage your subdomains to keep them functioning correctly and in line with your website’s goals.
Tips for Successful Subdomain Setup in Godaddy

Congratulations on creating your subdomain! Now that you’ve successfully added a subdomain in Godaddy, it’s time to ensure that it’s set up for success. Here are some tips and best practices to follow:
- Choose a descriptive subdomain name: Your subdomain should be easy to remember and relevant to your website’s content. This will help users and search engines identify the content on your subdomain.
- Ensure proper DNS settings: Double-check that your DNS settings are correctly configured for your subdomain. This ensures that your subdomain is accessible and loads correctly for users.
- Use SSL: Implementing SSL is crucial for website security, and it’s no different for subdomains. Make sure your subdomain is secured with SSL to protect user data and build trust with your audience.
- Create unique content: Avoid duplicate content on your subdomain. Instead, create unique content that adds value for your audience. This will help improve your website’s SEO and enhance the user experience.
- Regularly update and maintain: Just like your main website, your subdomains require regular updates and maintenance to perform optimally. Make sure to regularly check for broken links and update content to keep your subdomain relevant.
Remember, a well-crafted subdomain can significantly enhance your website’s functionality and performance. Follow these tips to ensure a successful subdomain setup in Godaddy.
Managing Your Subdomains in Godaddy
Now that you have successfully created a subdomain in Godaddy, it’s important to know how to manage and maintain it effectively. Here are some tips on how to handle your subdomains:
1. Regularly Check Your Subdomains
To ensure that your subdomains are functioning optimally, it’s important to regularly check them. This includes monitoring their performance and making any necessary changes. For example, you may need to update the content, add new features, or fix any issues that arise. By regularly checking your subdomains, you can ensure that they remain in line with your website’s goals and continue to enhance its functionality.
2. Update Your Settings
In addition to checking your subdomains, it’s also important to update your settings. Godaddy provides various management options that allow you to modify your subdomains’ features and settings. For example, you may need to change your DNS settings or update your subdomain’s security options. By keeping your settings up-to-date, you can ensure that your subdomains remain secure and functional.
3. Make Changes When Necessary
If you notice that your subdomains are not meeting your website’s goals or are not functioning optimally, it may be time to make some changes. This may include modifying their content, features, or settings. By making changes when necessary, you can ensure that your subdomains continue to enhance your website’s functionality and performance.
4. Utilize Godaddy’s Support
If you need any assistance with managing your subdomains, Godaddy provides excellent support options. You can access their knowledge centre, community forums, and customer support team to get the help you need. Additionally, Godaddy offers various tutorials and guides that can help you manage your subdomains more effectively.
Tip: If you’re new to managing subdomains, start small and gradually work your way up. This will allow you to get a better handle on how they work and how to manage them effectively.
By following these tips and utilizing Godaddy’s support options, you can effectively manage your subdomains and ensure that they continue to enhance your website’s functionality and performance.
5. Stay Ahead of the Competition
By understanding the importance of subdomains and how to add them in Godaddy, you can stay ahead of the competition and provide a better user experience for your website visitors.
Also Check: Is Godaddy Domain Protection Worth It?
Keep learning and exploring new ways to improve your website’s functionality and performance. With Godaddy’s intuitive platform and our helpful guide, there’s no limit to what you can achieve.
Conclusion
Adding a subdomain in Godaddy is a simple process that can enhance your website’s functionality. By following the step-by-step guide we’ve provided and implementing the best practices, you can maximize the performance of your subdomain and improve your website’s overall user experience.
Remember to regularly manage your subdomains to keep them up-to-date and in line with your website’s goals. This includes making changes, updating settings, and troubleshooting any issues that may arise.
FAQ
How do I add a subdomain in Godaddy?
- To add a subdomain in Godaddy, follow these steps:
- Log in to your Godaddy account.
- Access the settings for your domain.
- Look for the option to manage subdomains.
- Click on the “Add Subdomain” button.
- Enter the desired subdomain name and choose the domain it should be associated with.
- Save your changes and wait for the subdomain to propagate, which may take some time.
What are subdomains and how do they work in Godaddy?
Subdomains are extensions of your primary domain that allow you to create separate sections or websites under the main domain. They function as separate entities with their own unique content and settings. In Godaddy, subdomains can be used to organize your website into different categories or to create separate websites for different purposes.
How do I access my Godaddy account to create a subdomain?
To access your Godaddy account and create a subdomain, follow these steps:
- Go to the Godaddy website.
- Click on the “Sign In” button at the top-right corner.
- Enter your username and password.
- Click on “Sign In” to access your account.
- Once you’re logged in, navigate to the domain management section to find the subdomain settings.
Can you provide a step-by-step guide to creating a subdomain in Godaddy?
Certainly! Here is a step-by-step guide to creating a subdomain in Godaddy:
- Log in to your Godaddy account.
- Access the settings for your domain.
- Look for the option to manage subdomains.
- Click on the “Add Subdomain” button.
- Enter the desired subdomain name and choose the domain it should be associated with.
- Save your changes and wait for the subdomain to propagate, which may take some time.
Congratulations, you have successfully created a subdomain in Godaddy!
What are some tips for a successful subdomain setup in Godaddy?
To ensure a successful subdomain setup in Godaddy, consider the following tips:
- Choose a descriptive and relevant subdomain name.
- Properly configure DNS settings for your subdomain.
- Keep your subdomain’s content and design consistent with your main website.
- Regularly monitor and update your subdomain’s settings and content.
- Implement search engine optimization (SEO) techniques specific to your subdomain.
By following these tips, you can maximize the functionality and performance of your subdomain in Godaddy.
How do I manage my subdomains in Godaddy?
To effectively manage your subdomains in Godaddy, follow these steps:
- Log in to your Godaddy account.
- Navigate to the domain management section.
- Look for the subdomain settings or management options.
- From there, you can make changes to your subdomains, update settings, or troubleshoot any issues that may arise.
By regularly managing your subdomains, you can ensure they are up-to-date and aligned with your website’s goals.