
Have you ever wondered how to capture a screenshot on your iPhone 7? Whether you want to save a message conversation or capture important information, taking a screenshot can be a powerful tool.
In this guide by Techy Jin, we will guide you through the step-by-step process of capturing a screenshot on your iPhone 7. It’s incredibly easy to do, and I’ll provide you with some helpful tips and tricks to make it even smoother.
So let’s get started! First, let’s talk about the basic method of capturing a screenshot on an iPhone 7. You can take a screenshot by pressing the Home button and the Power button at the same time. The screen will flash white, and you’ll hear a camera shutter sound. The screenshot will be saved to your Photos app.
- Simultaneously press the side button and the volume up button.
- Release both buttons quickly.
- Once the screenshot is taken, a thumbnail will briefly show up in the lower-left corner of your screen. Tap the thumbnail to open it, or swipe left to dismiss it.
Now that you know the basics, let’s move on to some tips and tricks that will make the screenshot process even easier for you. By using the iPhone 7’s reachability feature, you can bring the top of your screen closer to your thumb for easier accessibility.
To enable reachability, go to Settings > General > Accessibility and toggle it on. Once enabled, swipe down on the bottom edge of your screen to bring the top of your screen closer to your thumb.
So that’s it! You now know how to take a screenshot on your iPhone 7. It’s incredibly easy to do, and with these tips and tricks, you’ll be able to capture your screen in no time. Remember to save your screenshots to your Photos app for easy access later on.
Post Contents
Quick and Easy Steps to Capture a Screenshot on an iPhone 7
Capturing a screenshot on an iPhone 7 is a straightforward process that requires no technical knowledge. As an iPhone user, you might want to take screenshots for various reasons like saving information, capturing chats, or merely preserving a memorable moment. In this section, I’ll provide you with a step-by-step tutorial on how to take screenshots on your iPhone 7. Along the way, I’ll share tips and tricks that can make the process more comfortable.
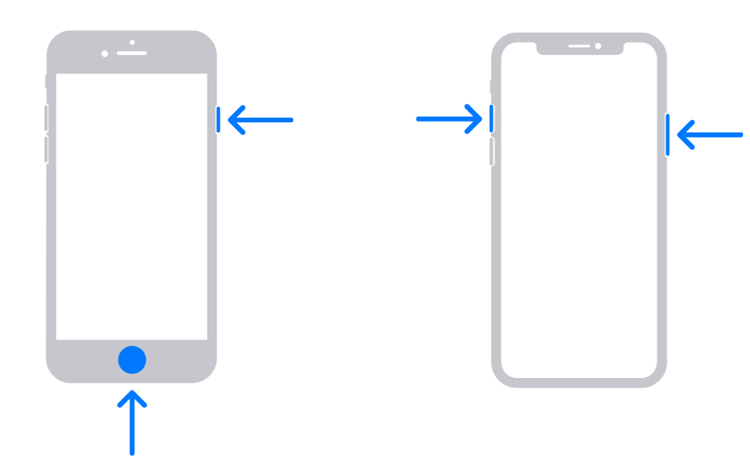
Step 1: Locate the Buttons
The first step towards taking a screenshot is identifying the buttons you need to press. On an iPhone 7, the relevant buttons are the Side button and the Volume Up button. The Side button is located on the right side of your device, while the Volume Up button is on the left. Ensure that both buttons are easily accessible before taking a screenshot.
Step 2: Position Your Screen
Once you have located the buttons, position your screen to capture what you want to save. Ensure that everything you want to capture is visible on the screen before proceeding to the next step.
Step 3: Press and Release the Buttons
With everything set, press and release both the Side and Volume Up buttons simultaneously. Don’t hold the buttons down, as this can trigger other actions. A screenshot capture sound will play, and your screen will flash momentarily to signal that the screenshot has been captured successfully.
Step 4: Locate Your Screenshot
After taking the screenshot, it will automatically be saved to your device’s Camera Roll. To locate your screenshot, open the Photos app and look for the screenshot in your Camera Roll folder. If you can’t find the screenshot, you can use the search function by entering the date and time of capture or keywords associated with the saved information.
Following these tips and tricks will make it easier and faster for you to take screenshots on your iPhone 7 screenshot tutorial, iPhone 7 screenshot tips, and iPhone 7 screenshot tricks. Now that you know how to capture quick and easy screenshots, you can save and share your favourite moments, conversations, and information with just a few taps.
Alternative Methods for Screen Recording on an iPhone 7
If you’re looking for more advanced options beyond just capturing a screenshot, there are several alternative methods you can try on your iPhone 7.
1. Screen Recording
The screen recording feature on your iPhone 7 lets you capture a video of your screen along with audio. To use this feature, you need to add the Screen Recording button to your Control Center. Here’s how:
- Go to Settings > Control Center > Customize Controls.
- Tap the green plus sign next to Screen Recording.
Once you’ve added the Screen Recording button, here’s how to use it:
- Open the app or screen you want to record.
- Swipe up from the bottom edge of the screen to open Control Center.
- Tap the Screen Recording button.
- Wait for the three-second countdown, then start recording.
- To stop the recording, tap the red status bar at the top of the screen and select Stop.
2. Screen Grab
Another alternative to taking a screenshot is to use the AssistiveTouch feature on your iPhone 7. This feature adds a virtual button to your screen that you can use to access certain functions, including taking a screenshot.
Here’s how to enable AssistiveTouch and use it to take a screen grab:
- Go to Settings > General > Accessibility > AssistiveTouch.
- Toggle the switch to turn on AssistiveTouch.
- Tap Customize Top Level Menu to add the Screenshot option to the virtual button menu.
Once you’ve set up AssistiveTouch, here’s how to take a screengrab:
- Tap the AssistiveTouch button on your screen.
- Select Device.
- Select More.
- Select Screenshot.
3. Screenshot Shortcut and Menu
Finally, there are a couple of shortcut options available for taking a screenshot on your iPhone 7. Here’s how to use them:
- Press the Power button and the Volume Up button at the same time to take a screenshot.
- Alternatively, press and hold the Power button, then tap the Home button to take a screenshot.
- You can also access the screenshot menu by swiping left on the thumbnail image that appears in the bottom left corner of the screen after you take a screenshot. This menu lets you annotate, crop, and share your screenshot without leaving the current app.
With these alternative methods for screen recording and screen grabs, you can customize your iPhone 7 screenshot experience to fit your specific needs.
Conclusion
In conclusion, taking a screenshot on an iPhone 7 is a handy feature that can be useful in various situations. Whether you want to capture a memorable conversation, save important information or share a photo with your friends, taking a screenshot is quick and easy.
By following the step-by-step instructions provided in this article, you can take screenshots on your iPhone 7 in a matter of seconds. Additionally, you can use alternative methods like screen recording or explore the screenshot menu to unleash the full potential of this feature.
Also Read: Where Is Siri on iPhone 14?
Remember to keep your iPhone 7 updated to the latest version of iOS to ensure that you have access to all the latest features, including improvements to the screenshot tool.
Thank you for reading this article, and I hope these tips have been helpful. If you have any questions or comments, feel free to share them in the comment section below.
FAQ
How do I take a screenshot on an iPhone 7?
To take a screenshot on an iPhone 7, follow these steps:
- Locate the buttons: Press the Home button (the circular button on the front of the phone) and the Power button (on the right side of the phone).
- Capture the screenshot: Simultaneously press and release the Home button and the Power button. You will see a flash on the screen, indicating that the screenshot has been captured.
- Access your screenshot: You can find your screenshots in the Photos app, under the “Screenshots” album. You can also access them directly from the Camera Roll.
Are there any additional tips for capturing screenshots on an iPhone 7?
Yes, here are a few tips to enhance your screenshot experience on an iPhone 7:
- Make sure your iPhone is not on mute: The screenshot sound is linked to the volume settings on your device. If your iPhone is on mute, you won’t hear the shutter sound when capturing a screenshot.
- Edit your screenshots: After taking a screenshot, you can tap on the preview thumbnail that appears at the bottom left corner of the screen to immediately edit or annotate your screenshot.
- Use AssistiveTouch: If you find it difficult to press the Home button and Power button simultaneously, you can enable AssistiveTouch in your iPhone’s Accessibility settings. This feature adds a virtual button on your screen that can be used to take a screenshot.
Can I record my iPhone 7 screen instead of taking a screenshot?
Yes, you can record your iPhone 7 screen using the screen recording feature. To enable screen recording:
- Open the Control Center: Swipe up from the bottom of your screen to access the Control Center.
- Find the screen recording button: Look for the circle icon with a solid white inside and a white outline. Tap on it.
- Start recording: A countdown will appear, indicating that your screen is being recorded. You can navigate to the desired screen or app and perform your actions.
- Stop recording: To stop the screen recording, either tap the red status bar at the top of the screen and select “Stop,” or open the Control Center again and tap the screen recording button to end the recording.
What other methods can I use to capture my iPhone 7 screen?
Apart from the standard screenshot method, there are a few alternative methods you can use to capture your iPhone 7 screen:
- Using Siri: You can use the voice command “Hey Siri, take a screenshot” to capture a screenshot hands-free.
- Using AssistiveTouch: If you have enabled AssistiveTouch, you can customize the virtual button to capture a screenshot. Simply go to the AssistiveTouch settings and assign “Screenshot” to one of the available gestures.
- Using the screenshot menu: When you take a screenshot, a small preview thumbnail will appear at the bottom left corner of the screen. Tapping on this thumbnail will open a menu where you can crop, edit, or share your screenshot instantly.